When backing up a WordPress blog, you need to know that you have to back-up not only the WordPress database but also some WordPress files. Backing up WordPress database will be subject of another post. This time, I’ll show you how to back-up your WordPress files automatically on schedule. Set it and forget it kind of way. 🙂
Ideally, you must back-up all the contents of wp-contents folder to have a full back-up of your WordPress files. However, that would consume a lot of time, CPU and memory resources. In my case, I just made a one-time back-up of my plugins and themes folder and made a scheduled back-up of the uploads folder. Contents of plugins and themes folder don’t change a lot. You can even download them from the plugin and theme maker when you lost your copy. Uploads folder contains all your images and other uploads when you make a post. This is what you should back-up regularly.
So, how do I back-up my uploads folder regularly and automatically? I use SyncBack. It’s an award winning back-up software. Best of all, it’s a free software! No nag screen. No advertisement. No registration. No payments. No expiration. A completely free software that does the job very well.
Syncback is a flexible back-up software. You can configure it to connect to your FTP server, check the files there, compare the files to your local back-up and download only the new files and files that are modified. You can schedule this task to run automatically every day, every week, every month depending on your needs.
Initial running of the software might consume so much time depending on your internet connection speed and the amount of files in your FTP server, since it will download ALL the files from your server to your local folder. Mine takes at least an hour to finish. But after that, it will just download the new and modified files on the next scheduled run. During a scheduled run, it runs in the background consuming less CPU and memory resources. So, you can do your work on your computer while it is backing-up your files.
Now, let me guide you on how to setup Syncback in your computer so that you can back-up your WordPress files automatically.
Download Syncback software here. Just download the free version which is only 1.77MB. Then, install it on your computer. Then, follow the instruction below to back-up your files from your server to your PC automatically:
1. Prepare your back-up folder. Create a back-up folder in your PC.
2. Run the Syncback software.
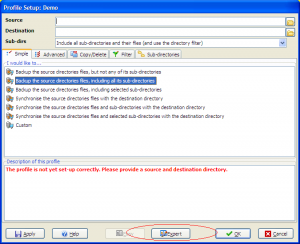
3. Create a new Profile. Click Profile > New. Choose Back-up when prompted. Create a descriptive name for your profile.
4. Click the Expert button below.
5. Specify the Source by clicking the folder icon beside it. Use the one you created on Step 1.
6. For the Destination, DON’T click the folder icon yet. Click the FTP tab first.
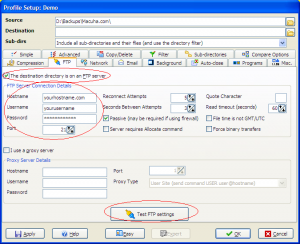
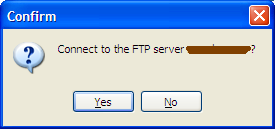
7. On the FTP tab, check “The destination directory is on an FTP server.” Then, input your FTP credentials. Click Test FTP settings to make sure that everything works fine.
8. Now, click the folder icon on the Destination. It will now connect to your FTP server. Browse until you find the uploads directory and click OK.
9. Now, you have defined the Source as your local folder and the Destination as the uploads folder in your FTP server. However, what we want is the other way around, your Source must be the FTP server and the Destination must be the the local folder in order to have a successful back-up. To do this, follow the next steps. 🙂
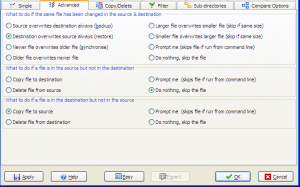
10. Click the Advanced tab. Copy the settings below. As you can see, we instructed the Destination and Source to do the reverse of their function.
Destination overwrites source always (restore). This means that your FTP server will always overwrite your local folder.
If the file is in the source but not in the destination, do nothing. This means that if it found a file in your local folder but not existing in your FTP server, don’t do anything. This is to protect your FTP server from getting unnecessary files from your local PC.
If a file is in the destination but not in the source, copy file to source. If a file is in the FTP server but not in your local folder, copy it to your local folder. This is the ultimate back-up command. When it find files in your FTP server that is not yet in the local folder, copy it!
11. Click OK. It will prompt you to do a Simulated Run. Click Yes. It will show you a report of what files it will copy if you actually run your settings.
12. If you are satisfied with the result of the Simulated Run, click Run. It will start copying those files from the FTP server to your local folder. This might take time depending on the contents of your uploads folder and your internet connection speed.
13. When everything is finished, click Schedule to make a schedule on when you want to run the settings automatically from your PC. Schedule uses your Windows Scheduled Task. Simply fill it up with your desired schedule and you’re done.
That’s it! Just make sure your computer is turned-on on your scheduled time. It will automatically start in the background while you are watching Youtube, Facebooking, or simply reading this blog. 🙂


How about the safety ? Is it a trustworthy software ? The most important things to check here is weather if the software would not hack any information from the users. Thanks
@Dennis… it’s a safe software. it’s been around for more than 3 years, my AVG would have warned me if it is a phishing / hacking software. it’s even graded 5 stars by the CNET editors and average 4 stars rating by users.
Thanks for this, Marhgil! 🙂 Now all I have to remember is to back-up my hard disk… and to back-up my back-up. Or use the Cloud.